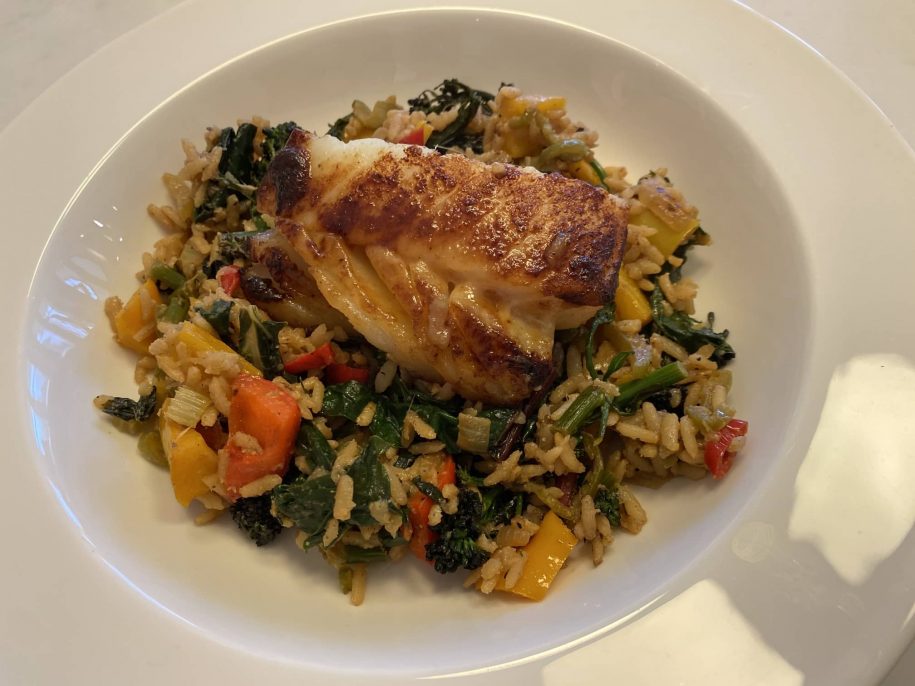
Blog – Right Sidebar

MISO FRIED RICE

by April 20, 2020

I made Miso Cod and wanted something to serve it with, so made some Fried Rice with a Miso-Lemon Sauce and it went together very nicely.

I used some Rainbow Swiss Chard (Silverbeet) and some Purple Sprouting Broccoli from my garden and added what other vegetables I had in the fridge.  Feel free to use your imagination and add what ever vegetables you like.

This would be delicious served by itself or with any other Fish or Chicken to complement it.

  • Onion – diced
  • Garlic – crushed
  • Ginger – grated
  • Red and Yellow Pepper – Diced
  • Purple Sprouting Broccoli – stems diced and tops left whole
  • Rainbow Chard – stems diced and leaves sliced
  • Celery – finely sliced
  • Red Chilli – finely sliced
  • Green Chilli – finely sliced
  • Cold Brown Cooked Rice
  • Coconut Oil

Sauce for the Fried Rice

  • Zest and Juice of 1 Lemon
  • 1 tablespoon Honey
  • 1 teaspoon Sesame Oil
  • 2 tablespoons of White Miso Paste

Mix all the Sauce ingredients together until it is nice and smooth.


In a wok heat some Coconut Oil and add the Onion and stir around until it is golden brown in places.

Add the Garlic, Ginger, Chillies and Celery and continue to stir fry.


Add the harder vegetables like the Peppers, stalks of the Broccoli and stalks of the Rainbow Chard.  Continue to Stir Fry.

Add the Rice, stir fry again and then add the leaves of the Rainbow Chard and the tops of the Broccoli.

Once the Rice and Vegetables are nicely combined, add in the Dressing and stir around for a minute.

It is now ready to serve!

DELICIOUS FLATBREADS – GLUTEN FREE !!

by April 10, 2020

This is a really simple but delicious recipe for Flatbreads.  I make it with Gluten Free flour and they work out perfectly.

  • 1 cup full fat plain yoghurt  –  I use Goats Yoghurt !
  • 1 cup Gluten Free Flour  –  I use the Dove brand !
  • 2 teaspoons Gluten Free Baking Powder
  • Melted Butter with some crushed Garlic in it


Combine the Flour and Baking Powder in a large bowl.  Add in the yoghurt and mix until the yoghurt has absorbed the flour.  You may not need all the Yoghurt, so only put in about 3/4’s at first and see how you get on.  The dough should come away from the sides of the bowl cleanly.

Flour your surface and take some dough and roll it out with a rolling pin until you get a nice thin shape.

Heat your frying pan over a medium heat and brush one side of the bread with some of the melted Garlic Butter.  I hold the bread in the palm of my hand and brush it with the Butter then flip it into the pan.  Allow the bread to brown and some little bubbles might form.  Cook for a few minutes, then brush the bread again with the Garlic butter and flip it over.  Allow this side to brown then put it on a plate and keep warm in the oven at a low temperature until you have cooked all the bread.  Serve warm !!  This will make approximately 5 flatbreads.


this recipe is based on a recipe by www.biggerbolderbaking.com


SCORCHED AUBERGINE SALAD

by April 10, 2020

Another Salad to add to the list  –  delicious !!!

  • 2 Aubergines
  • 2 Tomatoes, diced
  • 1 large handful of Coriander Leaves, chopped
  • 1 small handful of Mint Leaves, chopped
  • 1 large handful of Flat Leaf Parsley, chopped
  • 1/2 Red Onion, finely diced
  • 2 Garlic Cloves, crushed
  • Juice of 2 Lemons
  • 3 tablespoons of Extra Virgin Olive Oil
  • Sea Salt and freshly Ground Black Pepper


You need to scorch the Aubergines until the skin is black and the flesh inside is soft.  I did mine on a BBQ, but you can also do it successfully under the grill.  You do need the skin to be black, as this is what gives the Aubergine Salad its smoky flavour.


When cool enough to handle, peel off the black skin and finely chop the Aubergine flesh and put it into a large bowl.


Add the remaining ingredients and mix to combine them.


So simple and so tasty.


Recipe is from the book, Falafel for Breakfast!!!

CAULIFLOWER, TAHINI AND ZHOUG SALAD

by April 10, 2020

Another vegetarian salad as part of our Moroccan Vegetarian Feast !!!


This recipe uses Green Zhoug (recipe below) which is a green chilli paste.  You can add this to lots of things to add a bit of a kick.  It lasts a few weeks in the fridge.


  • 1 large Organic Cauliflower, cut into Florets
  • Sea Salt
  • 50g Tahini
  • Juice of 1 Lemon
  • Extra Virgin Olive Oil
  • 1 large handful of Coriander leaves, finely chopped
  • 1 tablespoon Cumin Seeds, toasted and crushed
  • 2 tablespoons Green Zhoug

Place the Cauliflower florets into a large bowl and sprinkle with Extra Virgin Olive Oil, tossing the Cauliflower so that each piece has some oil on it.

Place in a preheated oven 180 degrees and roast the Cauliflower until it is nicely brown on all sides, turning the pieces over during the cooking time.  Mine took around 25 minutes, turned the Cauliflower and then another 20 minutes.

Put the  Tahini, Lemon Juice and 2 tablespoons of Extra Virgin Olive Oil in a jar and shake until it is nicely combined.

Place the cooked Cauliflower into a salad bowl, season with some Sea Salt and spoon the dressing over it.  Scatter over the toasted and crushed Cumin Seeds and the prepared Zhoug.  Scatter over the Coriander Leaves.


Green Zhoug

  • 15 large Green Chillies, chopped
  • 10 Garlic Cloves, peeled
  • 1 large handful of Coriander, leaves and stems chopped
  • 1 large handful of Flat Leaf Parsley, chopped
  • 250 ml Extra Virgin Olive Oil

Put the Chillies, Garlic, Coriander and Parsley into a food processor and blend to a paste.  Add the Olive Oil and whizz again to combine.  Transfer to a sterilised jar and store in the fridge.


This recipe is from the cookbook, Falafel for Breakfast.


WARM MOROCCAN CARROT SALAD

by April 9, 2020

My eldest son who had been travelling in South America for 2 months arrived home safely from Peru and to celebrate his return I cooked a Middle Eastern Vegetarian Feast.  This was one of the dishes I cooked and it was delicious.

The recipe is from the book Falafel for Breakfast.


  • 800 g baby carrots trimmed and peeled (I used a selection of different colored baby carrots)
  • 2 tablespoons Olive Oil
  • 1 large green Chilli, seeds removed and finely chopped
  • 2 Garlic cloves, crushed
  • 1 Tablespoon Honey
  • 1 Teaspoon Ground Cumin
  • 1 Teaspoon Sumac
  • 50 g soft Goats Cheese, crumbled (I used little balls of Bollie Cheese)
  • 1 Tablespoon finely chopped Flat Leaf Parsley
  • Extra Virgin Olive Oil, to drizzle

Add Carrots to boiling water and simmer for 3 minutes.  Drain well.

Heat the Olive Oil in a large frying pan over medium heat.  Add the Carrots and cook for 1 minute so they are covered in the Olive Oil.

Add the Chilli and Garlic and cook for 1 minute.

Add the Honey and cook for 1 minute.

Add the Cumin and Sumac and toss well to combine.

Remove the pan from the heat and allow the Carrots to cool slightly, then transfer to a serving plate.

Scatter the Goats Cheese and Parsley over the top of the Carrots and drizzle with some Extra Virgin Olive Oil.


SAUERKRAUT – FERMENTED CABBAGE

by April 9, 2020

Sauerkraut is fermented cabbage.  During the fermentation process live bacteria are produced and these live bacteria are beneficial probiotics for your digestive system.   Probiotics help balance the bacteria in your digestive system, by introducing friendly bacteria which your gut likes.   Sauerkraut is a good form of dietary fibre.  It also contains Vitamins C and K and the Minerals Potassium, Calcium and Phosphorus.

You will need a sterilised jar with a lid and weight which fits inside the jar.  I sterilise these by putting them in the dishwasher with no dishwashing tablet.


You can use any type of cabbage, usually I make it with Red Cabbage, but this time I made it with Organic Green Cabbage.


  • 2 heads of Organic Cabbage (mine were quite small)
  • 2 teaspoons of Sea Salt
  • Other flavourings for example Caraway Seeds or Black Peppercorns.  I used a liberal sprinkling of Black Peppercorns.


Cut the Cabbage finely with a sharp knife.  If you use a food processor it is too small and goes mushy!

Put the Cabbage into a large plastic bowl and sprinkle the salt over it and mix though.


I use the end of a rolling pin to pound the Cabbage.  This takes a while as you need the Cabbage to release its juices.  The salt helps with this.  You need enough juice so that when you put it in the sterilised jar, the Cabbage is covered with juice.

Pack your Cabbage into your sterilised jar, packing it down well as you fill the jar.  Once you have put all the Cabbage in, pack it down and place your weight on the top of the Cabbage to make sure the juices are over the top of the Cabbage.


Close the lid and put it in a dark place for 4 days.  Each day open the jar to release the gas building up in the jar.  It will bubble up and you will know that it is working.

After 4 days, it is ready to eat.  Put in the fridge, this will stop the fermentation process.

Enjoy  –  it is lovely with cheese, german style sausages and mustard, cold meats, with a salad and just on its own.

Subscribe to our newsletter

Lorem ipsum dolor sit amet, consectetur adipiscing elit. Proin porttitor nisl nec ex consectetur, quis ornare sem molestie. 

Error: Contact form not found.

    Cart