Blog – Right Sidebar

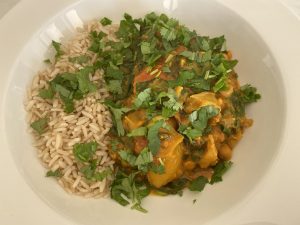
ROASTED VEGETABLE CURRY

by June 1, 2020

Made this very tasty Roasted Vegetable Curry and it got the thumbs up from all the family.  It has Chickpeas in it which are a good source of protein.  It is Dairy Free, Gluten Free and Vegan, so ticks lots of boxes !!!

I served this with Brown Rice and Fresh Coriander.

I based this on a recipe I tore out of the Business Post on the 24th May, as it used Rainbow Chard and I have lots growing in the garden.  Unfortunately I am not sure who the original author is as the page I kept does not have their name (sorry), but I modified it for our taste, so here is my version of it.

  • 1 large Sweet Potato – peeled and cut into chunks about 2 inches big
  • 2 large Carrots – peeled and cut into large chunks
  • Extra Virgin Olive Oil
  • 1 Cauliflower, cut into florets
  • 2 Yellow Peppers – cut into chunks
  • 2 Red Peppers – cut into chunks
  • 2 Onions – diced
  • 2 Celery Sticks  –  finely sliced
  • 6 cloves of Garlic  –  crushed
  • 3 inch piece of Ginger  –  peeled and finely grated
  • 2 Red Chillies – finely sliced
  • 1/2 teaspoon dried Chilli
  • 1 Tablespoon Ground Coriander
  • 1 Tablespoon Ground Cumin
  • 1 Cinnamon Stick
  • 1 1/2 teaspoons Tumeric
  • 1 teaspoon Chilli Powder
  • 2 Tablespoons Tomato Paste
  • 3 large Tomatoes – chopped into chunks
  • 1 can Coconut Milk
  • 1 can Chickpeas – drained and rinsed
  • 400 mls Vegetable Stock
  • large bunch Rainbow Chard –  roughly sliced (you could use normal Swiss Chard or Spinach)
  • Zest and juice of 2 Limes
  • Fresh Coriander

Preheat oven to 200 degrees.

Place the Sweet Potato and Carrots into a bowl and drizzle over some Olive Oil.  Toss around till they are coated and put on a large baking tray and put into the hot oven for 20 minutes.

Toss the Cauliflower Florets and the Yellow and Red Peppers in some more oil and add to the partly cooked Sweet Potato and Carrots in the oven.  Cook for another 20 minutes.

Meanwhile:  Heat a large heavy bottomed pan over the heat and add 3 tablespoons of Extra Virgin Olive Oil.  Add the Onions and Celery and saute until they begin to soften.

Add the Garlic and Ginger, cook for another few minutes.

Add the spices, – Ground Coriander, Ground Cumin, Tumeric, Cinnamon, Chilli Powder –  the 2 sliced Chillies and the Dried Chilli Flakes.  Add the Tomato Paste and stir well until combined.

Add in the chopped Tomatoes, Coconut Milk, Chickpeas, Vegetable Stock and simmer gently for 15 minutes.


Add the Roasted Vegetables to the sauce and gently simmer for about 10 minutes.

Take out the Cinnamon Stick and add in the sliced Swiss Chard, cook until it is wilted.

Take the curry off the heat and add the Lime Juice and Zest and stir to combine.

I served mine with Brown Rice and sprinkled the fresh Coriander over the top.


BAKED CHEESECAKE

by May 28, 2020

My husband is not really a dessert eater, but he loves this cheesecake, so for his birthday I just had to make it for him.

It is small but rich so you only need a small portion, but it is delicious.  This will easily serve 8 people with leftovers if no one has seconds!!!!

  • 150 g Digestive Biscuits
  • 50 g Butter – just melted
  • 85g Seedless Raisins
  • Grated Zest and juice of 1 large Lemon
  • 450 g Mascarpone Cheese (almost two tubs)
  • 200 ml Sour Cream (1 tub)
  • 100 g Caster Sugar
  • 2 Egg Yolks, beaten
  • 2 Tablespoons Cornflour

Preheat the oven to 200 degrees.

Grease a 20 cm springform cake tin and line it with baking paper.

Put the Raisins and Lemon Juice into a small saucepan and simmer gently for 5 minutes.  The Lemon Juice by this time will have been absorbed by the Raisins, but if you have liquid left over, then drain it off and leave the Raisins to cool.

Place the Digestive Biscuits into the food processor and whizz around until they are crumb like.

Add the Melted Butter and whizz a little more until it is incorporated.  The crumbs should stick together when pressed.

Press the crumbs down well into the base of the cake tin, making an even base for the Cheesecake.

Bake for 7 minutes then take out and leave to cool whilst making the rest of the Cheesecake.


In a large bowl beat together the Mascarpone and Caster Sugar until nice and smooth.

Stir in the beaten Egg Yolks, then the Cornflour, Sour Cream and Lemon Zest.


Carefully stir in the Raisins.

Pour the mixture into your cake tin, over the precooked biscuit base.

Cook for 45 to 50 minutes until nicely brown on top.

It will still be very wobbly looking but don’t worry, when it cools down it will firm up.

As it cools, it will sink a little into the middle, but this is perfectly normal.

Allow it to cool completely in the cake tin, otherwise it will fall apart.

Once cool, carefully remove the  Cheesecake from the tin, carefully remove the greaseproof paper and place the Cheesecake on your serving plate.  It is easy to do, the paper comes away very easily, but it is delicate so be careful!!!

Just before serving, sprinkle over a fine dusting of Icing Sugar (I forgot to do this in this picture!!)


THREE CHEESE PILLOWS WITH TOMATO SAUCE AND BASIL

by May 19, 2020

Here is my second recipe for Pasta Pillows  –    Cheese Pillows with Tomato and Basil Sauce !!!

Looking at the photo my Basil is a bit messy, but it was a family dinner !!!  Maybe you would do it a bit neater !!!

I used the pasta attachment to my kitchen aid, so you do need to have a pasta rolling machine for this recipe, either manual or attached to a mixer.

First to make the Pasta.  I used the recipe out of Jamie Oliver’s Italian cookbook.  However, I added some chopped Basil to the Pasta Dough to make a Basil Pasta.

  • 600g Tipo 00 Flour
  • 6 eggs
  • Bunch of Basil leaves, finely chopped
  • Semolina Flour for rolling out the Pasta Dough


Put the flour into a bowl, make a well in the centre and crack the eggs into it.  Using a fork, beat the eggs till smooth.  Add in the chopped Basil leaves.  Mix together with the flour as much as possible.  Flour each hand, and the worktop, and tip out the dough and knead.  You want to end up with a nice smooth elastic dough.


Mine was a bit sticky so I added some more flour to the kneading process.  Cover with cling film and leave to rest for 1/2 hour in the fridge before rolling and shaping it.

FILLING:

  • 2 small Buffalo Mozzarella, drained well.  I put mine in a sieve and let them sit for a little while to get out the excess moisture.
  • 1/2 tub Ricotta
  • 75g Parmesan Cheese, freshly grated
  • 1 egg yolk
  • Sea Salt and Ground Black Pepper to taste


Blitz all the ingredients together in a food processor.  You will have a delicious creamy puree.


SAUCE:

  • 2 tins Chopped Tomatoes
  • 2 cloves of Garlic, crushed
  • 1 Onion, finely diced
  • Sea Salt, Sugar and Freshly Ground Black Pepper
  • Extra Virgin Olive Oil


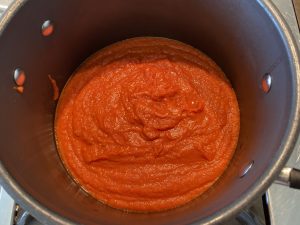
Heat some Olive Oil in a wide saucepan and add the Onion and Garlic.  Saute until the Onion is soft but do not let it brown.  Add the tins of Chopped Tomatoes and bring to a simmer.  Add some Sea Salt and Ground Black Pepper to taste.  As tinned tomatoes can be quite acidic and we are not adding other flavours to this sauce, I added 1/2 teaspoon of Sugar to the sauce to counteract the acidity.  If I was adding other flavours to this sauce I would not add the Sugar!  Let the Sauce simmer very gently for 45 minutes, by which stage it will be lovey and thick and full of flavour.  Using either a blender or hand held blender, puree the sauce so it is nice and smooth.


Now for the tricky bit:  Rolling out the Pasta and filling it with the Cheese mixture.

I used the pasta attachment on my Kitchen Aid.  I took a piece of Pasta Dough and put it through the No 1 setting on machine.  Then setting No 2, folding the Pasta over together and then putting it through again on No 2.  Then No 3 and then No 4.  (I tried No 5 but it made it too thin and difficult to handle).

Put some Semolina Flour on your bench and lay the sheet of Pasta down.  I have a round pasta cutter which I lightly placed on half the sheet to mark out my shapes and then filled each shape with a small portion of the Cheese mixture..  I wet around each shape with some water and folded the other half of the pasta over and pressed down around the filling.  Then I used my pasta cutter to press down and cut out the filled pasta shape.  Place these on a tray covered with Semolina Flour and continue on with the rest of the pasta until you have enough for your meal.  I served 6 per person.

I had Pasta Dough left over which I froze and used to make Tagliatelle later for another meal which worked perfectly!


To Cook the Pasta:  Bring a large saucepan of water to the boil and drop in your Pillows.  Once they have floated to the surface, they are cooked.  It only takes a few minutes.  Drain and put into heated bowls.  Cover with your Tomato Sauce and some fresh Basil Leaves.


Enjoy !!!


BUTTERNUT SQUASH PILLOWS WITH SAGE BURNT BUTTER SAUCE

by May 15, 2020

I decided to make some homemade pasta and make Ravioli, but I only have a round pasta cutter so I suppose they cannot technically be called ravioli!!  I made two types and here is the first one, Butternut Squash Pillows with Sage Burnt Butter Sauce.  Cheese Pillows with Tomato and Basil Sauce recipe will follow!!!   Many years ago we used to go to the south of Spain and there was a little restaurant high up in the hills which served the most delicious Pumpkin Ravioli with Sage Burnt Butter Sauce and since then I have never tasted one which was as good.  So I thought I would give it a try.  We thought it was delicious, so I hope you do too.

I used the pasta attachment to my kitchen aid, so you do need to have a pasta rolling machine for this recipe, either manual or attached to a mixer.

First to make the Pasta.  I used the recipe out of Jamie Oliver’s Italian cookbook.

  • 600g Tipo 00 Flour
  • 6 eggs
  • Semolina Flour for rolling out the Pasta Dough


Put the flour into a bowl, make a well in the centre and crack the eggs into it.  Using a fork, beat the eggs till smooth.  Mix together with the flour as much as possible.  Flour each hand, and the worktop, and tip out the dough and knead.  You want to end up with a nice smooth elastic dough.


Mine was a bit sticky so I added some more flour to the kneading process.  Cover with cling film and leave to rest for 1/2 hour in the fridge before rolling and shaping it.

FILLING:

  • 2 small Butternut Squash
  • 1/2 tub Ricotta
  • 1 egg yolk
  • Sea Salt and Ground Black Pepper to taste


Peel and cut the Butternut Squash into smallish pieces and roast in an oven at 180 degrees until they are nicely soft and a little brown around the edges.  Mine took around 1 hour and I turned them a few times to get even brown edges.  Once they have cooled down, whizz the Butternut Squash in a food processor with the Ricotta the egg yolk and Sea Salt and Pepper.  You will have a delicious creamy puree.


SAUCE:

  • a handful of fresh Sage leaves
  • 150g Butter


Now for the tricky bit:  Rolling out the Pasta and filling it with the Puree.

I used the pasta attachment on my Kitchen Aid.  I took a piece of Pasta Dough and put it through the No 1 setting on machine.  Then setting No 2, folding the Pasta over together and then putting it through again on No 2.  Then No 3 and then No 4.  (I tried No 5 but it made it too thin and difficult to handle).

Put some Semolina Flour on your bench and lay the sheet of Pasta down.  I have a round pasta cutter which I lightly placed on half the sheet to mark out my shapes and then filled each shape with a small portion of the Puree.  I wet around each shape with some water and folded the other half of the pasta over and pressed down around the filling.  Then I used my pasta cutter to press down and cut out the filled pasta shape.  Place these on a tray covered with Semolina Flour and continue on with the rest of the pasta until you have enough for your meal.  I served 6 per person.

I had Pasta Dough left over which I froze and used to make Tagliatelle later for another meal which worked perfectly!


To Cook the Pasta:  Bring a large saucepan of water to the boil and drop in your Pillows.  Once they have floated to the surface, they are cooked.  It only takes a few minutes.  Drain and put into heated bowls, ready for the Burnt Butter sauce.

Whilst the Pasta is cooking, make your sauce.  This is very simple.

Place the butter into a large frying pan and melt.  Add the Sage Leaves.  Keep cooking on a low heat until it starts to turn brown, then keep a good eye on it, you want it to be a nutty brown but not burnt.  Once it has achieved the desired brownness, take it off the heat and spoon over your Pumpkin Parcels, making sure some of the Sage Leaves are in each dish.


Enjoy !!!


ROASTED GARLIC AND NETTLE SOUP

by April 22, 2020

I have cultivated a patch of Nettles in my veggie garden and a few Sunday’s ago I  saw a recipe in the Independent by Susan Jane White for Nettle Soup so decided to make it and finally use up some of my fast growing Nettles.

I did manage to sting my leg with them, but after that once I donned my rubber gloves it was easy enough to handle them.

The Roasted Garlic gives a delicious flavour and we were all very happy with the finished soup.

I have frozen some of it ready for another day, I trust it will freeze OK, we will see!

I reheated it the next day for lunch also and it was perfect.  You just have to be careful to heat it gently and not let it boil away as you will lose that beautiful vibrant green color.

As usual I changed the recipe slightly so here is what I did.

  • 1 1/2  whole heads of Garlic
  • extra virgin olive oil in which Chillies have been marinating
  • 1 large Onion – diced
  • a huge bunch of young Nettles, leaves taken off the stalks and washed well in lots of cold water
  • 2 litres of Chicken Stock
  • Salt and Freshly Ground Black Pepper
  • 1 cup frozen Petits Pois


Firstly, you have to roast your Garlic, so in a preheated oven, place your Garlic in a large foil square, splash over the oil and close it up like a big dumpling.

Place it in the oven and cook until it is very soft inside.  My Garlic heads were big, so it took 50 minutes, but if yours are smaller it may only take 1/2 hour.

Leave aside to cool.


Saute the diced Onion in a saucepan with a splash of extra virgin olive oil.

Put your cleaned Nettles into the saucepan with the Onion and stir around.

Add the stock and season with Salt and Freshly Ground Black Pepper.

Bring to the boil and immediately reduce the heat to a simmer and cook for 4 minutes.  Don’t over cook it!!

Remove the pot from the heat and sprinkle in the Petits Pois, the heat of the soup will cook them.

Squeeze out the Roasted Garlic into the soup.

Blend the soup until it is lovely and smooth.


Remember when reheating to be very gentle as you don’t want to spoil the delicate taste of the soup and turn it a horrible grey color.


MISO COD

by April 21, 2020

I love Miso Cod when I am eating out in a Japanese Restaurant, so wanted to make it at home.  For my first attempt I was pretty pleased with it, it was extremely tasty!!!

It does take a few days marinating so you have to plan it in advance!!

  • 6 tablespoons Mirin
  • 6 tablespoons Gin (not authentic but I did not have Sake)
  • 1 cup White Miso Paste
  • 2/3 cups Sugar
  • Skinless Cod fillets

Combine the Mirin and Gin (or Sake) and bring to a boil in a small saucepan.

Whisk in the Miso until it is dissolved.

Add the Sugar and continue to cook it over the heat until the Sugar is dissolved.

Put the Marinade in a large baking dish and let it cool.

Add the fish and over it completely with the Marinade.

Cover and place in the fridge.

I left it marinading for 3 days, but turned it over every day.

To cook:

Preheat the oven to 180 degrees.

Take the Cod out of the marinade.


Heat some oil in a frypan which can go into the oven (or else you can place the browned Cod onto a baking dish)

Place the Cod top side down into the hot frying pan and let the fish develop a lovely brown color.  You want it to be quite brown in places.  Turn the Cod over and place the frying pan into the oven for approximately 8 minutes.  You want the fish to be still nice and flaky but not overcooked.

Enjoy!!!


Subscribe to our newsletter

Lorem ipsum dolor sit amet, consectetur adipiscing elit. Proin porttitor nisl nec ex consectetur, quis ornare sem molestie. 

Error: Contact form not found.

    Cart